
Feb 15th 2014
Canon Edible Printer Easy Setup and Maintenance Guide
UNPACK
Take the edible cartridges out from the power cord/ cartridge box. Please bear in mind that we fill each cartridge to its maximum, so minor leaking may happen during transportation. A minor leak will seem like a lot because it is ink. If there’s a minor leak, put the whole bag in a sink and use scissors to cut open the bag. Use cold, running water to wash off the ink and then use a paper towel to dry it. As long as the electronic ribbon is wiped dry, the cartridge can be used immediately. Do not put the cartridge in the open air for drying.
INSTALLATION
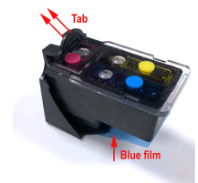
Step 1. Remove the Black Clip and Blue Film
Push the tab upward and remove the black clip from each cartridge. Peel off the protective blue film from the bottom of the cartridge. You may want to save the clip for future storage (see the maintenance section below).
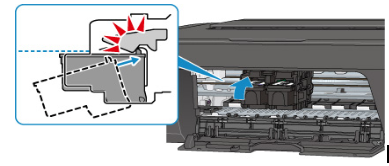
Step 2. Install the Edible Cartridges
Open the printer. Slide each cartridge in and push it until it clicks into its position.
Step 3. Install the printer driver software.
Step 4. Use the printer and cartridges as you would with a regular printer and cartridges
Since both your cartridges and printer are brand new, at this point there’s no special steps you need to take to operate them. Please keep in mind it’s good practice to print from time to time to prevent cartridges from drying out.
MAINTENANCE
TURN OFF THE INK LEVEL MONITOR AFTER A FEW WEEKS OF USE
You may notice the ink monitor on the computer indicating ink level going down. Because your cartridges are now refillable and roughly 3x the capacity of the original Canon cartridges, this estimated ink level is no longer accurate. The accurate ink level can be seen from the transparent cover.
Keep printing until you encounter an error window that says “Error 1686/1688: The following cartridge has been depleted”. With the error window open on your computer, go to the printer and hold the STOP (orange triangle) button down until the 1686/1688 window disappears from your computer screen. This turns off the ink level monitor. Do this again for the other cartridges once you encounter the same “1686/1688” prompt.
The ink monitor only needs to be turned off once for each cartridge, then you can enjoy refilling it again and again without any hassle. If you put in a different cartridge, for example, a new Canon cartridge, the ink monitor will reactivate. If you switch back to the spongeless cartridge, you will need to turn the monitor off once more.
If you are not sure how to turn off the ink level monitor, go watch this video beginning at the 3:15 mark:
After you turn off the ink monitor, the lights next to the cartridge should be blinking orange. This is designed to let you know that the printer will not track the ink level anymore.
REFILL
Refilling is easy: remove the color plug and fill the cartridge all the way to the top. There is a little white pinhole next to the color plugs. The hole is for the cartridges to breathe. Please do not cover it.
PRINTING
Some Canon printers such as the MG2500 and TS3100 series cannot print full letter-size glossy photos. To print a full-color page, you need to select regular paper as your paper source.
If you find that the print out looks faded, this is because the software didn’t pick the correct color profile for your printer. If you print by right-clicking a photo and selecting “Print,” it will use the Windows default viewer, which often has problems with a color profile. Try to print from real photo editing software such as PhotoShop or GIMP.
Try to print at least once a day. If you are not going to print for a long time, it is a good idea to take the cartridge out and store it. The black clip (from step 1) cannot work by itself. It will need some sealing tape on the bottom. We suggest 3M tape (link below). However, you can use a piece of Saran Wrap as an alternative. Do not use any desk tape or duct tape.
- 3M Tape: https://tinyurl.com/whhewux
- Extra Storage Clips:https://tinyurl.com/wtylk6y
UNCLOGGING
Print a nozzle check and identify which color has a problem. Take the cartridge out and use the included syringe to blow 1 ml of air into the white pinhole next to the color plug. Do this over the sink and have a paper towel ready. Once you see ink gushing out, remove the color plug to release extra pressure. Next, re-insert the plug and wipe off extra ink from the bottom of the cartridge.
REPLACE CARTRIDGE
Cartridges will eventually wear out. If you find no matter how many times you unclog the cartridge, the quality is still not satisfactory, then it is time to replace the cartridge.
TROUBLESHOOTING
In the following paragraph, we will define “printer works” as the printer moves and can produce a page mechanically, even if the page is blank or of low quality.
The printer works, but the printer shows “low ink”
The printer will not recognize the refilled ink level. You need to keep using the printer until the ink monitor is down to zero, and an error “1686/1688” pops up. Next, you can turn off the ink monitor. You cannot turn off the ink monitor, however, before it reaches zero. Ignore all the “low ink” warnings, and ignore all the yellow lights until the error window “Error 1688/1686” pops up.
There is Error “1686/1688”
When the ink monitor is at 0%, you will see this popup window. Do not close this window. Press and hold the STOP (triangle) button for 5 seconds. This will turn off the ink indicator. If you are not sure how to do it, go watch this video beginning at the 3:15 mark: https://youtu.be/kzQVXjbrZ5Q The cartridge lights should be blinking yellow after you turn off the ink monitor. Now you can print forever with this cartridge.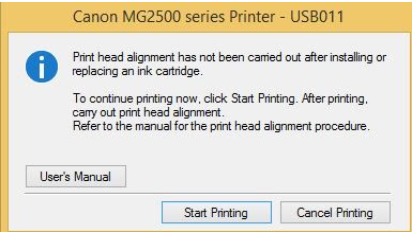
There is a message about alignment
Click “Start Printing” and keep using the printer. You don’t need an alignment unless the print comes out in good quality but in a zig-zag pattern.
The printer doesn’t work with a cartridge & hazard light blinking
The printer may display “the following cartridge cannot be recognized.” Therefore, try taking out the unrecognized cartridge, drying off the electronic ribbon, and checking to see if it is covered with ink. Turn off the power on the printer and unplug the printer for about 30 to 60 seconds. Plug in the printer, power it back on, reinstall the cartridge, and print. If the printer keeps rejecting this cartridge, the cartridge may have gone bad. These cartridges were originally designed for one-time use and can go bad at any time.
The printer doesn’t work, no error message
By the error message “doesn’t work,” we mean the printer will not print at all. You can put a color page on the scanner and make a copy. If the printer can copy but won’t print, it is likely a software/network problem, especially with the wireless setup. DO NOT contact Lamda Living about this problem because it has nothing to do with the ink system. Try: 1) restart the computer 2) restart the printer, and 3) CALL Canon (800) 652-2666 and tell them your printer can copy but can’t print.
The printer works, but the output is blank, missing color, or in poor quality
This is due to clogging. Ideally, you will need a tool like this one: https://tinyurl.com/y67elugr (for PG-243/CL-244; PG-245/CL-246, or PG-210/CL-211) or this one: https://tinyurl.com/yxvdafxk (for PG-40/Cl-41 or PG-240/CL-241). However, if you don’t have these tools available, you can use a paper towel to wrap around the cartridge and use a vacuum hose to suck underneath it. We summarized the five most common unclogging techniques here: https://tinyurl.com/y6ex5umc